Affiliate Disclosure: Some of the links in this post are affiliate links. This means we may earn a small commission if you make a purchase through these links—at no extra cost to you. We only recommend products and tools that we genuinely believe will help you with your woodworking projects.
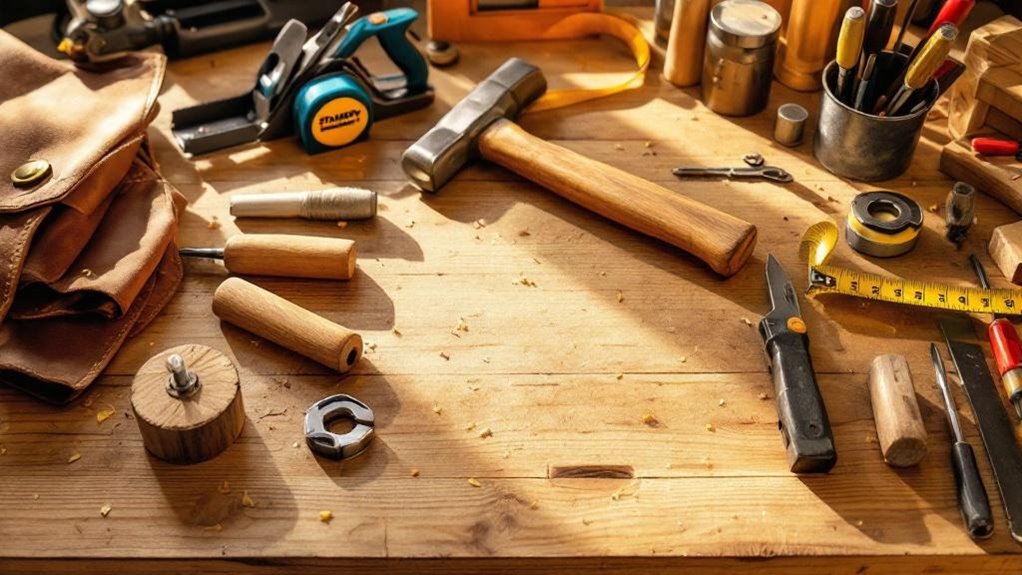
Start by nailing accurate layout: use a 25‑foot tape measure, a try square for right angles, and a marking gauge for scribed lines. For cutting, get a quality dovetail/back saw for fine straight work plus a coping saw for curves. Add a small chisel set for shaping and joinery, and a simple hand plane for smoother surfaces. Learn basic sharpening and tool care early, then grab reliable clamps and essential safety gear so your projects stay square and predictable—there’s more ahead.
- Key Takeaways
- What Hand Tools Beginners Need First?
- Measuring and Marking Tools
- Beginner Hand Saws for Clean Cuts
- Chisels for Shaping and Joinery
- Hand Planes for Smooth Surfaces
- Clamps That Hold Projects Steady
- Hammers and Mallets for Assembly
- Screwdrivers Every Beginner Should Own
- Drilling Tools for Simple Projects
- Rulers, Squares, and Gauges
- Coping Saws and Spokeshaves for Curves
- How to Choose Durable Hand Tools?
- Beginner Tool Sets vs. Individual Tools
- Must-Have Safety Gear for Hand Tools
- How to Sharpen and Maintain Hand Tools
- Beginner Hand Tools for Small Workshops
- Best Brands for Beginner Hand Tools
- Building Your First Woodworking Toolkit
- Frequently Asked Questions
- Conclusion
Key Takeaways
- Start with essential measuring and marking tools: a 25-foot tape measure, try square, and marking gauge for accurate layouts.
- Choose beginner-friendly cutting saws: a backsaw or dovetail saw for fine straight cuts and a coping saw for curves.
- Use reliable clamps for assembly, such as F-style clamps for larger pieces and C-clamps for smaller work.
- Invest in practical hand assembly tools, including a balanced 20 oz. claw hammer and quality Phillips/flathead screwdrivers.
- Prioritize safety with goggles, hearing protection when needed, and dust masks or respirators for fine particles.
What Hand Tools Beginners Need First?
If you’re just starting out with woodworking, focus first on a small set of reliable hand tools that cover measuring, cutting, clamping, and shaping.
You’ll need a tape measure, try square, and marking gauge to lay out accurate lines before you cut. Add a high-quality hand saw, such as a coping saw for curves or a backsaw for joinery, so you can shape pieces cleanly.
Use a tape measure, try square, and marking gauge to lay out accurate lines before cutting.
A dependable clamping system keeps joints tight while glue dries, and it’s worth buying early. For refinement, use chisels and a hand plane to trim edges and smooth surfaces.
A utility knife and a set of screwdrivers also help you assemble and disassemble projects efficiently. Choose durable hand tools first; they’ll improve accuracy and save frustration.
Measuring and Marking Tools
To make accurate cuts and joints, you’ll need essential layout tools like a tape measure, try square, ruler, and marking gauge.
You can use a tape measure for board lengths, a try square to check right angles, and a marking gauge to lay out parallel lines for joinery.
Careful, consistent marking helps you place parts correctly and reduces errors before you cut.
Essential Layout Tools
Precise layout is the foundation of good woodworking, so you’ll want a few reliable measuring and marking tools at hand from the start.
In Measuring and Marking, accuracy matters because every cut and joint depends on it. A 25-foot tape measure gives you the reach to size boards and check overall dimensions quickly. A ruler helps you confirm shorter lengths with speed and confidence.
Try squares let you verify squareness, so your edges, corners, and assembled parts stay aligned. Marking gauges help you scribe parallel lines, which is especially useful when laying out mortises and tenons.
With these essential layout tools, you can work more consistently, reduce errors, and make cleaner, more precise joinery throughout your projects.
Accurate Marking Methods
Accurate marking starts with the right measuring and marking tools, because even a small error can throw off a cut or joint. You’ll get better results when you check every dimension before you cut, and use tools suited to the task.
A tape measure helps you cover board lengths and larger layouts, while a ruler gives quick, precise short measurements. Try squares keep edges truly square, so your joints fit cleanly. Marking gauges let you scribe parallel lines for mortises and tenons, which improves consistency.
- Use a tape measure for overall dimensions
- Use a ruler for fast, exact layout
- Check squareness with try squares
- Set marking gauges for parallel lines
- Recheck marks before cutting
Beginner Hand Saws for Clean Cuts
For clean, beginner-friendly cuts, a coping saw or backsaw is a smart place to start, and a dovetail saw is especially useful when you need tight-fitting joints with fine control. Beginner hand saws suit joint work and intricate projects because they’re easy to guide and reward steady pressure. Choose TPI to match the cut: lower counts, around 7-10, remove stock faster; higher counts, 10-20, leave smoother edges.
| Saw Type | Best For | TPI Range |
|---|---|---|
| Coping saw | Curves | 10-20 |
| Backsaw | Straight cuts | 10-20 |
| Dovetail saw | Fine joints | 12-20 |
| Rip saw | Along grain | 7-10 |
| Crosscut saw | Across grain | 7-10 |
A comfortable grip and balanced feel help you cut accurately and stay less fatigued.
Chisels for Shaping and Joinery
A good chisel is a backbone tool for shaping and joinery in woodworking. You use chisels for precision cutting, cleaning corners, and trimming joint surfaces so parts meet tightly.
Pick bench chisels for general work, then add specialized chisels for dovetails or mortise-and-tenoning when your designs demand accuracy. A practical beginner set spans about 1/4 in to 1 in, giving you control over fine details and quicker material removal on larger sections.
Choose blades made from high-alloy carbon or chromium-vanadium steel so the edge holds and stays durable across many wood types. Keep your chisels sharp with proper sharpening tools like waterstones, and you’ll get cleaner cuts with less force.
- Match chisel width to the joint
- Use bevel-down for consistent cuts
- Clear chips often for straight walls
- Sharpen regularly, not only when dull
- Test-fit before final assembly
Hand Planes for Smooth Surfaces
Once you start aiming for furniture-ready surfaces, hand planes help you level boards and refine grain by shaving off thin, curling slivers instead of scraping.
For beginners, low-angle block planes stand out: you can handle different grain orientations with less setup and easier control. When you’re ready for broader work on a bench, choose a jack plane as your starter bench plane; it flattens, smooths, and bevels edges as needed.
For final surface clarity, use smoothing planes, but tune them properly. Set the mouth, adjust the cap iron, and dial in the blade projection so fibers slice cleanly, producing a glass-like finish instead of torn grain.
Investing in a quality model, like the Lie-Nielsen No. 4 Smoothing Plane, boosts performance and longevity.
Clamps That Hold Projects Steady
Clamps keep your workpieces aligned while glue cures, so you get tight joints instead of gaps or skewed corners. When you choose clamps, match the style to the size of your project and how you’ll apply pressure.
Clamp workpieces as glue cures to prevent gaps or skewed corners, ensuring tight, aligned joints. Choose the right clamp style for your pressure needs.
Use F-style clamps for larger workpieces; their adjustable arms let you reach and squeeze evenly. Choose C-clamps for smaller pieces, where you need quick, secure holding without complicated setup. For wide spans, pipe clamps work well; cut a pipe to length and you’ll get a custom-grip reach.
Keep multiple clamps on hand, because even pressure across joints usually requires more than one clamp at a time.
- Hold edges flush while glue sets
- Apply steady pressure, not twists
- Use F-style clamps for big panels
- Use C-clamps for small assemblies
- Use pipe clamps for long gaps
Hammers and Mallets for Assembly
When you’re assembling wood projects, you’ll rely on hammers and mallets to bring parts together without fighting misalignment. For driving nails and seating wooden components, start with a versatile hammer—like a common 20 oz. claw hammer—because it handles everyday assembly steps.
Choose a hammer that’s well-balanced and comfortable in your hand, since better control reduces fatigue and improves accuracy on repetitive hits. For gentler assembly, use mallets made from wood or rubber. A lightweight rubber mallet is especially beginner-friendly: it delivers firm impact while minimizing dents on delicate surfaces and helping you strike chisels safely.
Match the tool to the task, and you’ll get cleaner joints and more reliable alignment.
Screwdrivers Every Beginner Should Own
You’ll want both Phillips and flathead screwdrivers so you can match the screw head without forcing the fit.
Choose the proper size for each screw to avoid cam-out and stripping, and focus on grip and control—an ergonomic handle helps you apply steady pressure with less hand fatigue.
If you prefer easier starts in tight spots, consider magnetic tips to hold screws in place while you drive them.
Phillips And Flathead
A solid set of Phillips and flathead screwdrivers covers most beginner needs around the house.
You’ll use a Phillips screwdriver’s cross-shaped tip to grip Phillips-head screws securely and apply more torque for furniture assembly and common repairs.
You’ll rely on a flathead (slotted) screwdriver’s single straight blade for screws with a straight slot, and you can carefully pry light covers or small parts when needed.
Look for quality construction: hardened, chrome-plated steel tips resist wear and keep your screwdriver performing longer.
Many sets bundle both types in multiple sizes, so you can match the task without hunting tools.
- Cross tip for Phillips-head screws
- Straight blade for slotted screws
- Better torque with less cam-out
- Hardened, chrome-plated steel for durability
- Versatile multi-size sets for projects
Proper Size Selection
Start with a basic screwdriver set that includes flathead and Phillips head screwdrivers, sized from about 3/16″ up to roughly 1″. Match the tip to the screw head width so the screwdriver seats fully and doesn’t cam out.
For tough materials, add a heavy-duty long screwdriver to increase leverage and torque. For cramped areas, choose a stubby screwdriver so you can reach fasteners without interference.
Prioritize quality: use hardened steel shafts to resist wear and ergonomic handles that support consistent pressure.
If you’re assembling often, magnetic tips help you pick up and hold screws, reducing drops and speeding up setup.
Grip And Control
- Use a firm, centered grip
- Keep the tip seated before turning
- Favor magnetic-tip screwdrivers for quick starts
- Choose correct flathead/Phillips sizes
- Prioritize high-carbon steel or chrome vanadium
Drilling Tools for Simple Projects
When you start drilling simple projects, focus on tools that let you control the hole size and depth without complex setup. Your core drilling tools include hand drills, which are beginner-friendly and let you create clean holes in wood for many tasks.
Use a brace and bit set when you need versatile diameters, since you can swap bits for both small pilot holes and larger openings. For fine, accurate work, pick gimlets; they’re small, hand-powered, and help you drill without wandering.
To cut larger holes, choose hole saws, available in many diameters for doors, cable paths, and other openings. Finish-ready screws call for countersink bits, so screw heads sit flush and won’t snag on surfaces.
Rulers, Squares, and Gauges
When you measure wood lengths, you want accuracy fast, so use a properly sized ruler and check readings at eye level before you cut.
To keep your layout square, rely on a try square for right angles and make square layout checks with common 6-in or 12-in sizes.
For parallel lines, use a marking gauge with a sharp point to scribe clean reference marks for mortises and tenons.
Accurate Measurement Basics
Accurate measurement sets the foundation for clean cuts and tight joinery, so start with the right tools and learn how to read and use them consistently. Use measuring tools like a ruler to get quick, precise lengths in both standard and metric units; read the scale at eye level to avoid parallax.
For right angles, use a try square to mark and check squareness on workpieces before you cut. When you need repeatable lines, use a marking gauge to scribe parallel reference marks for mortises and tenons.
A combination square—like the Starrett 12-in.—covers ruler, protractor, and square duties, simplifying setups. If you’re fine-tuning joints and fittings, switch to digital calipers to remove guesswork. Keep marks light, lines consistent.
- Select metric or standard and stick to it
- Verify zero and blade/edge alignment
- Scribe, don’t gouge, for clean reference lines
- Lock the workpiece before measuring
- Measure twice, then mark once
Square Layout Checks
Ever wonder why some projects fit together cleanly while others fight you at the bench? You start square with reliable rulers, tape measures (at least 25 ft helps), and tried-and-true squares.
Use a try square to confirm the edge is 90° to the face before you cut, because even small drift ruins joints and assembly alignment. For layout, run square layout checks across corners and along reference edges, then verify each line is truly perpendicular. A combination square, like a 12-in. Starrett model, lets you measure and mark in one setup, reducing error.
Keep tools clean, store them flat, and regularly calibrate the ruler and square—accuracy over time directly protects fit and structural integrity.
Marking Gauge Uses
A marking gauge is one of the most practical hand tools for turning layout into repeatable accuracy. You use a marking gauge to scribe precise, parallel lines on wood, which guides cutting or joining operations like mortising and tenoning. Set the fence to the correct offset from an edge, then lock it and draw the pin along the work. That single reference line helps you keep parts consistent and reduces guesswork.
For faster sizing, rely on a ruler to confirm lengths and dimensions before you transfer them. To maintain squareness, use try squares for crosscuts and joints. A combination square adds measurement, marking, and squareness in one sturdy tool, like the Starrett 12-in. version. A cutting gauge marks parallel cut lines, minimizing tear-out and improving fit.
- Set fence for repeatable offsets
- Scribe parallel lines for joinery
- Use rulers to verify dimensions
- Use try squares to hold 90°
- Use combination squares for measuring and marking
Coping Saws and Spokeshaves for Curves
Coping saws and spokeshaves help you cut and shape curves with control, whether you’re fitting a complex profile or smoothing a gradual bend.
If you need tight inside turns, choose coping saws: the thin blade sits in a U-shaped frame so you can maneuver accurately. You’ll also like that the blade is easy to replace and tension, letting you adapt to different material thicknesses.
For smoothing after cutting, use spokeshaves. They’re built for shaping curves with a flat blade, and you adjust the depth to control how aggressively you remove wood.
You’ll often cut chair legs and other curved parts faster than with power tools, while staying tactile and precise. Both tools bridge straight and curved work.
How to Choose Durable Hand Tools?
To choose durable hand tools, start by matching the tool’s materials and build quality to the jobs you actually do.
Look for durable hand tools made from high-quality materials like chrome vanadium or chrome molybdenum steel, so you get hardness without losing toughness.
Pick ergonomic designs that fit your hand, because comfort reduces fatigue and improves control during long sessions.
Check precision features: tight tolerances and properly finished, sharp edges help the tool perform consistently and safely.
Choose respected brands known for longevity, such as Lie-Nielsen for woodworking tools, to protect your investment.
Finally, plan regular maintenance—sharpening and care routines followed from the manufacturer’s guidelines will extend service life.
- Chrome vanadium/molybdenum steel balance
- Ergonomics for control
- Tight tolerances, sharp edges
- Quality brands you can trust
- Follow upkeep and sharpening schedules
Beginner Tool Sets vs. Individual Tools
When you start woodworking, a starter set can cover the basics—measuring, cutting, and clamping—so you can begin projects without hunting for every item.
If you’d rather match your workflow, pick tools one-by-one so you can prioritize quality and add items only when a specific task demands it.
For best value, buy a basic set for foundational work, then upgrade with select high-quality individual tools as your precision needs grow.
Starter Sets Benefits
Starter tool sets give you a practical on-ramp to woodworking because they bundle the foundational measuring, cutting, and shaping tools you need for common projects. This is one of the key starter sets benefits: you get a balanced assortment of hand tools designed for novices, so you won’t end up missing an essential step.
Buying as a set is often more cost-effective than purchasing individual tools, since bundles usually include discounts and save you from compatibility guesswork. You also receive a mix of measuring, cutting, and shaping tools, letting you handle many tasks right away.
Many beginner tool kits add instructional guides and project ideas, which helps you learn fundamentals and build confidence.
- Fewer purchase decisions up front
- Better tool compatibility
- Immediate coverage for common tasks
- Guidance for early technique
- Reliable tools for diverse projects
Pick Tools One-By-One
If you’re deciding between beginner tool sets and individual tools, start by recognizing what you’ll actually use: a set gives you bundled measuring, cutting, and shaping essentials like a tape measure, hand saw, chisel, and clamps, while buying one-by-one lets you choose specific versions that match your interests and skill level.
Pick tools one-by-one if you want the best hand tools tailored to your projects. Start with core items you’ll reach for—plan on at least five, such as tape measure, utility knife, and hammer—then add only what fills a gap.
Compare feel, edge quality, and adjustability before you buy. With individual tools, you can invest in quality over quantity, avoiding low-grade sets that leave you frustrated.
Use sets only as a baseline, then upgrade key tools as your confidence grows.
Best Value Approach
Choosing the best value comes down to whether you want bundled coverage now or customized upgrades later.
If you’re new, a best value approach often means buying beginner tool sets first. Sets usually cost less than piecing together individual tools, because you get essential items—like a hand saw, chisels, hammer, and measuring devices—without paying full retail for each piece.
Many well-regarded kits from brands like Kreg® or Stanley BlackDecker land around $100–$200, so you can start basic projects sooner. Buying individual tools can run higher overall, with quality options costing $30–$100 each.
You also reduce decision fatigue; the set limits choices so you can focus on technique instead of shopping.
- Start with bundled essentials
- Check included measuring tools
- Compare kit price to single-tool totals
- Upgrade later as skills grow
- Choose quality, not just quantity
Must-Have Safety Gear for Hand Tools
When you pick up hand tools, you need more than skill—you need safety gear that matches the hazards in your workspace. Start with safety goggles to shield your eyes from wood chips, dust, and debris during cutting and sanding.
Add hearing protection—earplugs or earmuffs—whenever you use louder tools, since repeated exposure can cause long-term damage. Use a dust mask or respirator to avoid breathing fine particles from cutting, sanding, and finishing, because respiratory harm can build up over time.
Wear cut-resistant gloves when handling sharp tools like chisels and saws to reduce accidental cuts and scrapes. Finally, choose anti-slip footwear to keep stable footing and lower the risk of slips or falls.
How to Sharpen and Maintain Hand Tools
Sharpening and maintaining hand tools keeps your cuts cleaner, your work faster, and your hands less fatigued. For sharpening tools like chisels and planes, use waterstones: start with a consistent stroke pattern, then progress to finer grits to reach a fine edge quickly while maintaining efficiency. To keep angles repeatable, use honing guides; they reduce guesswork and user fatigue.
Sharpen chisels and planes on waterstones with consistent strokes, progress through grits, and use honing guides for repeatable, fatigue-free angles.
- Clean tools after each use to prevent rust and damage.
- Apply a light coat of oil to protect metal from moisture.
- Store tools in a dry place, using wooden racks or magnetic strips.
- Inspect edges often for chips or uneven sharpness.
- Re-sharpen promptly to preserve accuracy and performance.
Beginner Hand Tools for Small Workshops
To build a small workshop you’ll want a sturdy workbench plus a tape measure and combination square, and you’ll add a hand saw and coping saw so you can handle straight cuts and tight shapes.
For space-saving choices, pick clamps you can trust—like F-style or bar clamps—and use an ergonomic utility knife and a small chisel set for joinery, trimming, and cleanup.
Start with a beginner workshop setup that keeps measuring, cutting, and sharpening within reach, so you work accurately without extra strain or frustration.
Essential Starter Tools
A solid set of essential starter tools gives you everything you need to start building accurate, clean projects in a small workshop.
Start with a reliable measuring tape, at least 25 feet long, so you can measure boards and layouts precisely before cutting. Next, add a quality hand saw for straight, repeatable cuts; pair it with a coping saw when you need tight curves and intricate shapes.
Use clamps to hold workpieces while glue dries, preventing drift and misalignment for stronger joints. Finally, get a beginner set of chisels, starting around 1/4 inch, to clean up joints and make fine adjustments.
- Measuring tape (25 ft minimum)
- Quality hand saw
- Coping saw for details
- Clamps for alignment
- Chisels for joinery cleanup
Space-Saving Tool Choices
With limited bench space, you’ll get more done by choosing compact, versatile hand tools that still deliver accurate results. Favor space-saving tools like a compact hand saw and a utility knife so you can handle many cutting jobs without clutter.
For accuracy, keep a 12-inch combination square and a retractable tape measure; they store flat and pull out only when needed. Use clamps—especially F-style clamps—for holding boards, aligning joints, and working on small assemblies, and store them neatly when you’re done.
For tools you’ll reach for often, pick lightweight chisels and hand planes so they’re easy to manage and transport. If you can, choose a multi-functional workbench with integrated storage so everything stays organized in tight spaces.
Beginner Workshop Setup
Start by setting up a sturdy bench area that fits your space and keeps your tools within easy reach. You’ll work faster and make cleaner cuts when your hand tools have a dedicated spot, and your bench reliably supports projects.
- Add a tape measure, try square, and marking gauge for accurate layouts and repeatable marks.
- Keep a hand saw, coping saw, and utility knife ready for straight, curved, and quick cuts.
- Buy a basic set of chisels to clean joints and shape wood with controlled depth.
- Use clamps to hold parts during assembly and while glue cures.
- Organize storage so hand tools return to their positions after each task.
With this setup, you’ll measure precisely, cut safely, and assemble confidently in a small workshop.
Best Brands for Beginner Hand Tools
Choosing the right beginner hand tool brands helps you build skills without overspending, because these companies focus on accurate, easy-to-use designs that cover common first projects. For Woodworking Hand Tools, start with Kreg® for pocket-hole jigs; the Pocket-Hole Jig 720PRO at $129.99 helps you practice joinery reliably. Add Starrett measuring tools like a 12-in. combination square ($106.34) so your layout stays true. If you want long-term cutting quality, Lie-Nielsen’s premium planes and chisels earn their keep. For flexible cutting workflows, Adaptive Cutting System’s precision saw and guide track kits cost $399.99. Finally, Gyokucho Japanese saws give clean, controlled sawing.
| Brand | Best for | Entry fit |
|---|---|---|
| Kreg® | pocket-hole joinery | budget practice |
| Starrett | measuring accuracy | layout confidence |
| Lie-Nielsen | planes/chisels | lifetime value |
Building Your First Woodworking Toolkit
- Tape measure for quick, accurate dimensions
- Try square for crisp 90° lines
- Marking gauge for consistent reference lines
- Coping and tenon saws for versatile cutting
- Clamps plus a hand plane for clean fit and finish
Frequently Asked Questions
What’s the Best Tool for Tightening Loose Screws Without Stripping Heads?
Use a properly sized screwdriver or bit with a snug fit. Press down firmly while turning slowly; stop when resistance rises. If heads strip, switch to a fresh, matching tip, or use a manual impact driver gently.
Which Pliers Are Safest for Beginners When Cutting or Gripping?
You’ll want pliers that feel downright forgiving: needle-nose for gripping small parts, slip-joint for general work, and lineman’s for cutting soft wire. Choose insulated grips, matched jaw alignment, and clean cutters—so you grip straight, not twist.
How Do I Choose the Right Hammer Weight for General Assembly Tasks?
Choose hammer weight by task size: for general assembly, start around 16–20 oz. If you’re driving small nails or brackets, go lighter; for tougher parts or thicker stock, go heavier. Match your swing comfort and control.
What Beginner Clamps Prevent Slipping on Flat and Uneven Surfaces?
Clamps are like steady hands holding a sail in shifting winds; use these: quick-grip bar clamps for flat work, F-style clamps with pads for uneven boards, and spring clamps plus rubber faces for light tack-ups.
How Much Force Should I Apply When Driving Fasteners by Hand?
Apply steady, controlled pressure: enough to seat the fastener without bending or stripping. Use firm hand force, then stop once it’s snug; don’t “lean harder” unless you’ve checked alignment, pilot holes, and material thickness.
Conclusion
As you start your first toolbox, think of it like planting a garden: the measuring tools are your compass, saws and chisels are your pruning shears, and a hand plane is your steady sun. Sharpening and care keep everything growing instead of stalling. Begin with a compact, reliable set for small projects, choose brands that stand behind quality, and add tools only as your needs expand. You’ll build skills—and confidence—one clean cut at a time.